Classic Apple Pie Recipe: Homemade Perfection
🍽️ Nothing captures the essence of homemade comfort quite like a slice of warm classic apple pie fresh from the oven. This timeless dessert represents generations of baking tradition and simple, honest flavors.
Classic apple pie stands as America's beloved dessert, combining a flaky, buttery crust with spiced apple filling that's both tart and sweet. This traditional recipe has been passed down through families for generations, and for good reason. The combination of perfectly baked apples, warm cinnamon, and crispy pastry creates an unforgettable experience that transcends trends and seasons.
Furthermore, making classic apple pie at home is more achievable than you might think. With quality ingredients and careful attention to technique, you'll create a pie that rivals any bakery. The key lies in understanding proper crust preparation, apple selection, and baking time. Whether you're an experienced baker or attempting pie for the first time, this comprehensive guide walks you through each step with confidence.
📋 Table of Contents
▼
🌟 Why Classic Apple Pie Remains Timeless
Understanding what makes classic apple pie special helps you appreciate every element of this beloved dessert. The science behind traditional pie-making combines chemistry, technique, and quality ingredients.
The Perfect Pie Crust Foundation
The foundation of any exceptional classic apple pie is its crust. A proper pie crust requires cold butter cut into flour, creating small pockets that steam during baking. These pockets produce the flaky, tender texture that defines superior pie. Additionally, the ratio of fat to flour is critical—too little butter yields a tough crust, while too much creates a greasy result. Therefore, precision in measurement and technique determines your success.
Apple Selection and Preparation
Not all apples work equally well in classic apple pie. Granny Smith apples provide tartness and hold their shape during baking, while Honeycrisp or Braeburn varieties add sweetness and complexity. Moreover, using a combination of apple types creates depth of flavor that single-variety pies cannot achieve. The acidity in tart apples balances the sweetness, preventing the filling from becoming cloying.
- ✓ Cold butter creates flaky, tender crust layers
- ✓ Tart apples maintain shape and balance sweetness
- ✓ Proper chilling prevents shrinkage during baking
- ✓ Spice combination enhances natural apple flavor
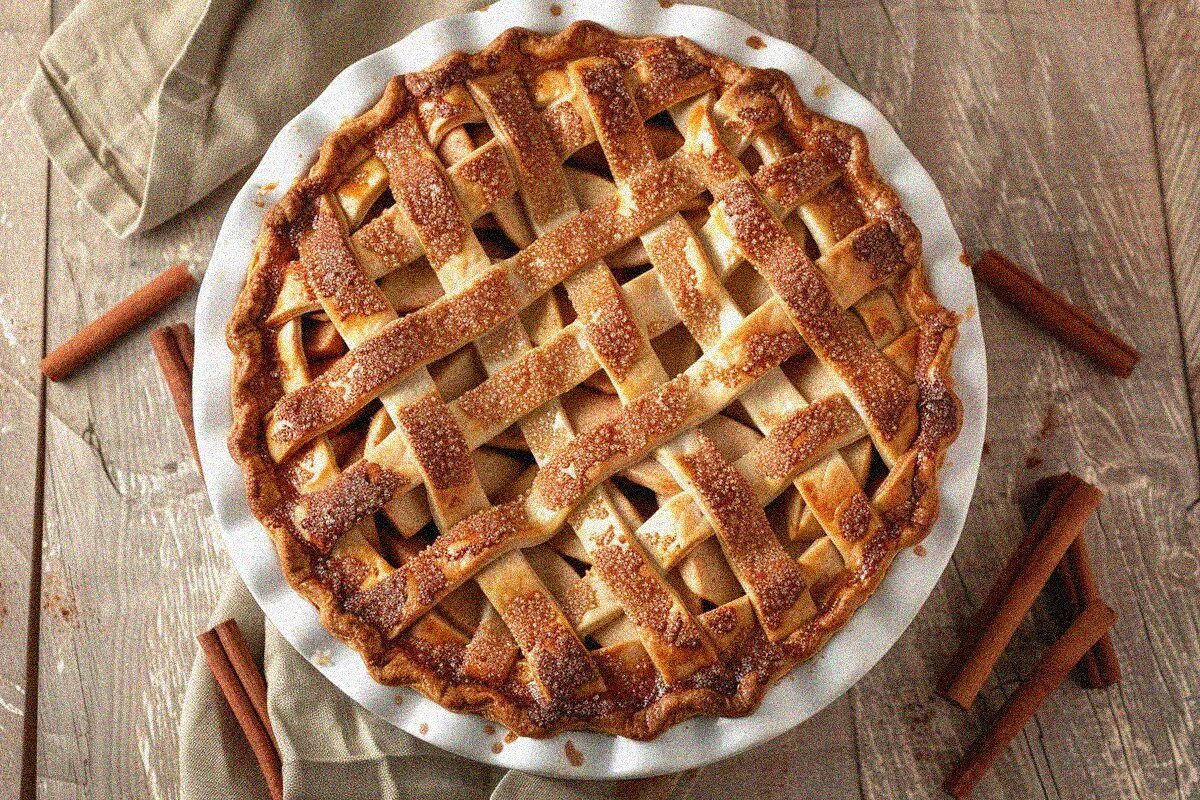
A perfectly baked classic apple pie with golden lattice crust, ready to serve warm
⚖️ Advantages and Considerations for Classic Apple Pie
Like any traditional recipe, classic apple pie presents specific strengths and considerations worth understanding before you begin baking.
Making an Informed Baking Decision
Evaluating the practical aspects of making classic apple pie helps you prepare properly and set realistic expectations for your baking experience.
✓ Advantages
- Timeless appeal that works for any occasion or celebration
- Uses common, affordable ingredients available year-round
- Can be made entirely from scratch without special equipment
- Freezes beautifully for up to three months before baking
- Improves in flavor after sitting overnight
- Versatile enough for ice cream, whipped cream, or à la mode serving
- Impressive presentation despite simple technique
- Teaches fundamental baking skills applicable to other pastries
✗ Disadvantages
- Requires patience for proper crust chilling and resting
- Homemade crust demands more skill than using store-bought
- Time-consuming preparation compared to no-bake desserts
- Contains dairy and eggs (not suitable for vegan diets)
- Oven space limitations if baking multiple pies
- Crust can brown too quickly if oven temperature is inconsistent
- Apple selection affects final flavor profile significantly
- Requires cooling time before serving to set filling properly
🎯 Essential Techniques for Classic Apple Pie Success
Mastering these fundamental techniques ensures your classic apple pie achieves professional-quality results. Each step builds upon the previous one, creating the foundation for excellence.
Crust Preparation and Temperature Control
The most critical aspect of classic apple pie baking is maintaining proper crust temperature throughout preparation. Cold ingredients and cold work surfaces prevent butter from melting into the flour prematurely. Consequently, your crust develops the desired flaky texture. When butter melts before baking, it creates a dense, tough crust rather than the delicate layers you want. Therefore, work quickly and keep everything as cold as possible.
Filling Assembly and Spice Balance
Proper filling assembly prevents soggy bottoms and ensures even cooking. Toss sliced apples with sugar, spices, and lemon juice, then let them sit for fifteen minutes. This allows the apples to release their juices, which you'll partially drain before adding to the crust. In fact, this technique prevents excessive liquid from making the filling watery. Additionally, using both cinnamon and nutmeg creates complexity that single-spice fillings lack.
- ✓ Keep all ingredients and equipment thoroughly chilled
- ✓ Use ice water when making dough, adding gradually
- ✓ Chill dough discs for minimum thirty minutes before rolling
- ✓ Drain excess apple juice before adding filling to crust
- ✓ Brush egg wash for beautiful golden-brown finish
📚 Flavor Variations and Creative Enhancements
While classic apple pie is perfect as-is, you can explore variations that honor tradition while adding personal touches. These adaptations maintain the essential character of the original.
Spice and Ingredient Variations
Beyond the traditional cinnamon and nutmeg, consider adding cardamom, allspice, or ginger for unique flavor dimensions. A splash of vanilla extract or almond extract enhances complexity without overwhelming the apple flavor. Moreover, adding a tablespoon of cornstarch to the filling thickens it beautifully without affecting taste. For a modern twist, try adding bourbon or brandy to the filling—the alcohol cooks off, leaving subtle warmth and depth.
Crust Creativity and Topping Options
Traditional lattice crust remains stunning, but you can also try a decorative edge using a fork or fluted wheel. Furthermore, a crumb topping made from flour, butter, and brown sugar provides textural contrast. Some bakers add a touch of maple syrup to the filling or brush the crust with maple syrup before baking. For serving, classic apple pie pairs beautifully with vanilla ice cream, cinnamon whipped cream, or sharp cheddar cheese.
- ✓ Add cardamom or allspice for sophisticated flavor
- ✓ Include vanilla or almond extract for depth
- ✓ Use cornstarch to achieve perfect filling consistency
- ✓ Try crumb topping for textural contrast
- ✓ Serve with ice cream or cinnamon whipped cream

The perfect slice reveals layers of flaky pastry and tender, spiced apples
💡 Storage and Make-Ahead Strategies for Classic Apple Pie
Planning ahead transforms pie-making from stressful to manageable. Classic apple pie offers excellent make-ahead flexibility, allowing preparation days in advance.
Proper Storage Methods
After cooling completely, store classic apple pie covered loosely with foil at room temperature for up to two days. Subsequently, refrigerate for an additional three to four days if needed. For longer storage, wrap the cooled pie in plastic wrap and aluminum foil, then freeze for up to three months. When ready to serve, thaw at room temperature for four to five hours, or overnight in the refrigerator.
Make-Ahead Preparation Timeline
The beauty of classic apple pie lies in its flexibility. You can prepare the crust dough up to two days ahead, keeping it wrapped in the refrigerator. Additionally, you can assemble the pie completely and freeze it unbaked for up to one month. When baking a frozen pie, add ten to fifteen minutes to the baking time. In fact, many bakers prefer this method because the crust stays flakier when baked from frozen.
- ✓ Store cooled pie loosely covered at room temperature
- ✓ Refrigerate for up to four days for extended freshness
- ✓ Freeze wrapped pie for up to three months
- ✓ Prepare dough two days ahead and refrigerate
- ✓ Freeze assembled pie unbaked for maximum convenience
📖 Recipe Card
🥘 Ingredients
- 2 cups all-purpose flour
- 1 cup granulated sugar
- 3 large eggs
- 1/2 cup unsalted butter, softened
- 2 tsp vanilla extract
- 2 tsp baking powder
- 1/2 tsp salt
- 3/4 cup whole milk
👨🍳 Instructions
- Preheat your oven to 350°F (175°C). Grease and flour a 9-inch round cake pan.
- In a medium bowl, whisk together flour, baking powder, and salt. Set aside.
- In a large bowl, cream together butter and sugar until light and fluffy, about 3-4 minutes.
- Beat in eggs one at a time, then add vanilla extract.
- Alternate adding flour mixture and milk, beginning and ending with flour mixture.
- Pour batter into prepared pan and smooth the top.
- Bake for 30-35 minutes until a toothpick inserted in center comes out clean.
- Cool in pan for 10 minutes, then turn out onto a wire rack to cool completely.
📊 Nutrition Information
❓ Frequently Asked Questions
Granny Smith apples are ideal because they’re tart, firm, and hold their shape during baking. However, combining them with sweeter varieties like Honeycrisp, Braeburn, or Pink Lady creates complexity. Use approximately 60% tart apples and 40% sweet apples for the best balance. Avoid Red Delicious apples as they become mushy and lack flavor.
Tough crust typically results from overmixing the dough or using warm ingredients. Cold butter creates steam pockets that produce flakiness. Additionally, overworking the dough develops gluten, making it tough. Mix just until the dough comes together, and keep all ingredients and equipment cold throughout the process. Use ice water and work quickly.
Several strategies prevent soggy bottoms. First, drain excess juice from the apples before filling. Second, brush the unbaked crust with egg white or melted butter to create a moisture barrier. Third, place the pie on a preheated baking sheet, which helps the bottom crust cook faster. Finally, ensure your oven temperature is accurate—a hot oven sets the crust quickly.
Absolutely! You can prepare the crust dough two days ahead and refrigerate it. Furthermore, you can assemble the entire pie and freeze it unbaked for up to one month. When baking from frozen, add 10-15 minutes to the baking time. Many bakers prefer this method because the crust stays flakier. You can also bake the pie completely and store it at room temperature for two days or refrigerate for up to four days.
The filling should reach 200-205°F (93-96°C) for proper thickening. Use a food thermometer inserted into the center of the pie, avoiding the crust. The crust should be golden brown, and the filling should bubble slightly at the edges. If the crust is browning too quickly, cover it loosely with foil for the remaining baking time.
Homemade crust provides superior flavor and texture, offering flakiness that store-bought versions struggle to match. However, quality store-bought crusts offer convenience for busy bakers. If using store-bought, thaw according to package directions and handle gently. For the best results, invest time in making homemade crust—the difference is noticeable and rewarding.
🎉 Final Thoughts
Classic apple pie transcends generations, representing more than just a dessert—it embodies tradition, comfort, and the joy of homemade baking. By mastering this timeless recipe, you join countless bakers who've created memories around this beloved dish. The combination of flaky crust, spiced apple filling, and proper technique yields results that store-bought pies simply cannot match. Moreover, the knowledge you gain applies to countless other pastries and baked goods.
Whether you’re baking for a holiday gathering, a casual family dinner, or simply to treat yourself, classic apple pie delivers satisfaction on every level. The aroma alone fills your kitchen with warmth and anticipation. Furthermore, knowing you created something beautiful and delicious from basic ingredients brings genuine pride. For additional inspiration, explore our collection of classic dessert recipes homemade: Master Traditional Treats Today to expand your baking repertoire.
Key Takeaways:
- ★Keep all crust ingredients and equipment thoroughly chilled
- ★Use a combination of tart and sweet apples for depth
- ★Drain excess apple juice to prevent soggy filling
- ★Bake on a preheated sheet for crispy bottom crust
- ★Allow complete cooling before slicing for proper texture
Ready to create your masterpiece? Gather your ingredients, chill your equipment, and begin your classic apple pie journey today. Don’t forget to share your beautiful creation with loved ones. For more delicious Fruit Desserts: Easy Recipes for Fresh & Delicious Homemade Treats, continue exploring our recipe collection.
Baking classic apple pie is an act of love and tradition. Every slice represents your commitment to quality, your respect for time-honored techniques, and your desire to create something meaningful. This recipe has nourished families for generations, and now it's your turn to continue that legacy. The perfect classic apple pie awaits in your kitchen.